Carburetors are prone to cold start issues, poor fuel economy, and complicated upkeep. And while yes, they are not as efficient as modern fuel management systems, they certainly are not as bad as many make them out to be. A well-tuned carburetor (carb) can be every bit as street able and enjoyable to drive as a car with a fuel injection system. There are differences between carburetors and fuel injection but adjusting a carburetor will go a long way toward your classic car engine running at its peak performance.
That is not to say you will not need to learn your way around a carb, though. As the owner of a classic car, you will need to spend some time under the hood adjusting ensure the system is running right. Do not worry. You do not need to be a rocket scientist to set a good baseline. Nor do you need to know the finer points of carb theory to keep your historic ride running.
What Is Adjusting a Carburetor?
So, what exactly are we adjusting, and why are we adjusting it? This article is all about adjusting your idle mixture and speed. The reason for this is because it is the one thing that most carbs have in common. Even if they look different and handle wide-open throttle conditions in various manners, the majority rely on the same basic principles for adjusting idle running conditions—even the methods of making adjustments are very similar.
The primary goal of making these adjustments is to achieve the appropriate engine speed at idle while ensuring it runs as smoothly as possible. In doing so, you are establishing the proper fuel and air mixture at idle and setting an excellent baseline for further tuning.
Bear in mind that a carb supplies air and fuel to the engine differently at idle than it does at wide-open throttle. In short, separate systems and components come into play once you step on the gas pedal. They, too, will need dialing in. But before you get into that, you want to make sure that you have all your idle adjustments in order as all systems come together to determine how the vehicle behaves in Park or Neutral and what it has to work with as you lean into it.
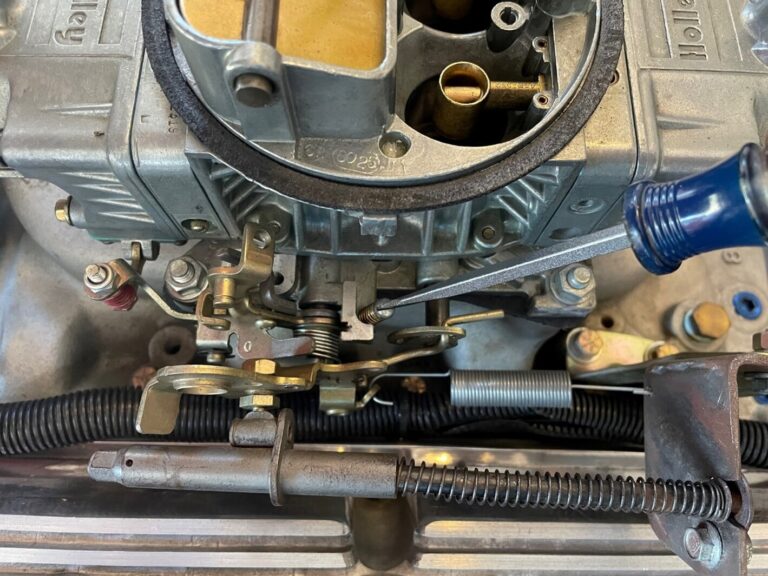
Your means of making these adjustments is with the external idle speed screw and idle mixture screws. Keep in mind the location of these screws will vary with each model of carb, so you will have to check your specific carb’s manual to find their exact location. For example, Holley Carburetors typically feature the idle mixture screws on the side of the metering block, while Rochester and Edelbrock’s carburetors feature the idle mixture screws on the face of the carburetor.
The reason that you need to make adjustments is because the carb cannot. As temperature, altitude, and even the weather change, so does atmospheric pressure, meaning more or less air is available to the engine. Because the adjustments you make are analog, the amount of fuel going into the engine does not change with the atmosphere. So, you must adjust the carb to correct the engine’s running condition at idle.

Carburetor Adjustment Safety
Unless you are setting the baseline, the adjustments you are making to the carb are performed while it is running. While the pros never seem to mind, it is still important to be mindful of the risks before getting started. Be sure to follow these safety tips throughout the procedure.
- Look for fuel leaks. Carburetors are on older vehicles, and there is always a chance that there is a fuel leak. If you detect one, make sure to deal with it appropriately before proceeding. Even a tiny backfire is enough to cause a fire with gas on the manifold—ask me how I know.
- Keep your fingers clear of the engine fan. For the most part, you will be working away from the fan. However, there is always the risk of coming in contact with it and injuring yourself.
- Avoid hot surfaces. Some parts of the engine can get hot enough to cause second or third-degree burns. The carb itself should not get anywhere near those kinds of temperatures, but you should still be mindful of hand placement as you work to prevent burning yourself.
- Never place your fingers near or in the opening of the carburetor. As the engine runs, it can backfire, sending a fireball through the carb. The flame and pressure created can cause severe injury.
- You are working around moving parts and strong chemicals. It is wise to wear a set of safety glasses and protective gloves to keep your skin and eyes intact as you work.
Everything You will Need Adjusting a Carburetor
We cannot say what you have on hand, but we can say that you do not need a lot to adjust your carburetor. In fact, the only tools you really need are a screwdriver and your ears. But, if you are looking for an easier method that positively determines your engine’s run condition as you tune, you might consider growing your collection.
Tools
- Screwdriver
- Vacuum Gauge (Optional)
- AFR Gauge(Optional)
Organizing your tools and gear so everything is easily reachable will save precious minutes waiting for your faithful assistant to bring you the sandpaper or a pipe wrench.
You will also need a flat workspace, such as a garage floor, driveway, or street parking that is also well-ventilated.
Here’s How to Adjust a Carburetor
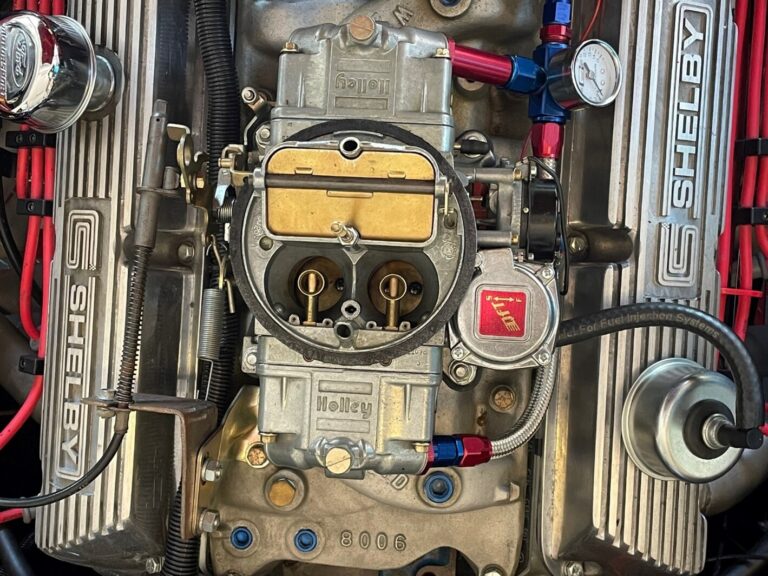
- Remove the Engine Air Filter. The air cleaner and filter assembly must be removed for you to access the carb.
- Locate Adjustment Screws. Before beginning, you should familiarize yourself with the location of the idle mixture and idle speed screws.
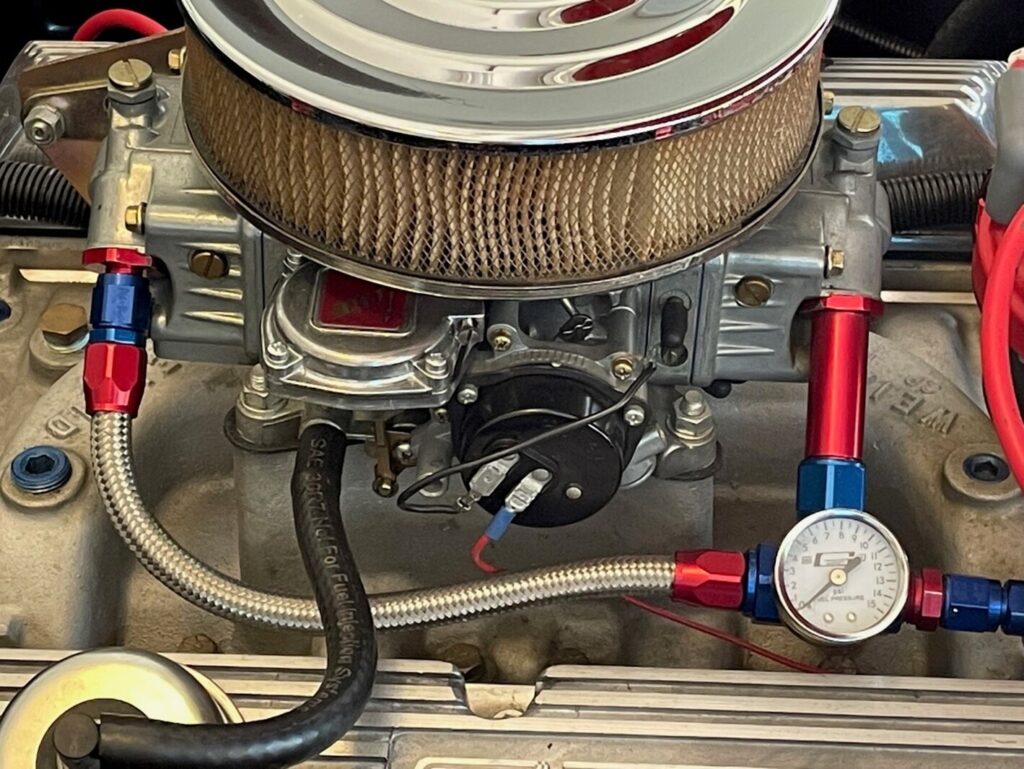
- (Optional): Hook up Vacuum Gauge. If you are using a vacuum gauge for this process, you should find and connect it to a manifold or carb vacuum port before starting the engine.
- (Optional): Set Baseline. If the carburetor is new or has been rebuilt, you should set it to “factory” adjustment. You can do so by adjusting the idle mixture screws to 1.5-2 turns out, and the idle speed screw to 1-1.5 turns in.
- Warm the Engine Up. The engine’s running temperature directly correlates with proper air and fuel mixtures. So, be sure to let the engine run and reach normal operating temperatures before proceeding.
- (Optional): Adjust Idle Speed Screw. If you set a baseline in step 4, chances are idle is a little high. Be sure to adjust it so that you start with the engine’s normal running speed. You may need to perform this during warm up if the idle speed is too high after reverting to “factory” spec.
- Adjust the Air-Fuel Mixture. Begin by adjusting the idle mixture screws by one-eighth turn increments in or out. Be sure to adjust each in direct relation to the other as you proceed if you have more than one idle screw (most two and four-barrel carburetors do).
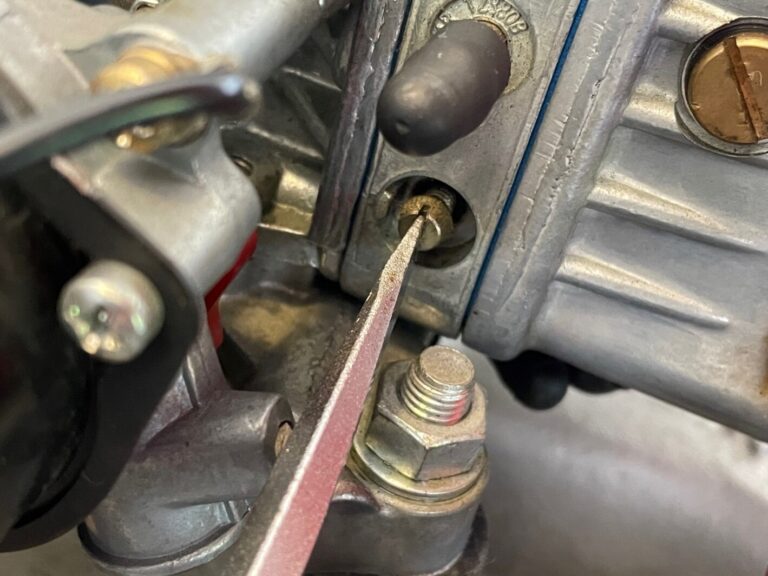
Holley crab fuel mixture screw

Rochester/Edelbrock idle mixture screw locations
8. Observe the Engine’s Condition and Continue to Adjust. After each adjustment, give the engine a few seconds to adjust. If it gets rougher or vacuum drops, go the opposite way with the idle mixture screws. If engine speed smooths out or vacuum increases, continue to adjust the screws in the direction you were until it hits the peak engine speed or vacuum.
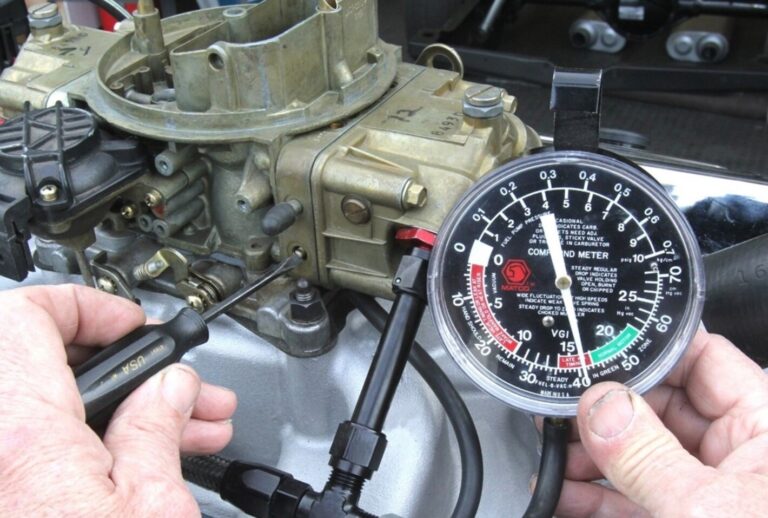
Adjust idle mixture until you reach peak steady vacuum reading
9. Test the Engine at Idle and While Revving. Once peak running condition is met, rev the engine, and monitor the condition when the RPM’s drop back to idle. After revving, the idle run condition may change, and you may need to repeat steps 6 and 7.
10. Adjust Engine Idle speed. Idle speed will increase as proper adjustments are made. Once you hit peak running condition, adjust the idle speed screw as needed.
Holley idle speed screw location

Rochester/Edelbrock idle speed screw
Sometimes You Need a Certified Mechanic
We know that not everyone has the proper tools, a safe workspace, the spare time, or the confidence to tackle major automotive repairs. Sometimes, you just need quality repair work performed by professionals
Advanced Tips for Adjusting a Carburetor
The steps above are the basic steps to turn your carb that even the novice DIY mechanic can undertake. There are further adjustments and fine tuning that can be done to a carburetor to enhance its performance.
- Making sure the ignition timing is right is essential to getting your engine in the best run condition. Keep in mind that modern units typically require the timing to be more advanced at idle and you can expect to add a few degrees to initial timing for the best results.
- Do not make the mistake of assuming that float bowl levels are fine. Any time you make adjustments it is wise to inspect and adjust fuel levels to ensure the engine can perform properly at idle and otherwise.
- Reverting to factory spec isn’t always necessary, but it can be useful. Especially if you are not familiar with the current running condition or if the carburetor is brand neworfreshly rebuilt.
- Even if a carburetor is brand new, it still needs tuning. Your engine, its condition, your location, and the weather all come into play and the carburetor needs to be adjusted properly.
- Adjusting a carb is something you perform frequently. It might sound silly but sudden changes in the weather and altitude will impact the way your car runs. As the seasons change or you travel you should adjust accordingly.
- There is more to tuning carburetors than just adjusting the idle mixture and speed. If you want to improve the performance at part, and wide-open throttle you will need to dive further into tuning the carburetor. This is where things vary by the carburetor, and you take a step up from the beginner level of tuning.
- Be mindful of that idle speed screw. If you find yourself having to go more than two turns in to keep the car running, it is likely that adjusting the idle mixture screws makes no difference. If that is the case, the carburetor may need a thorough cleaningor more advanced tuning steps are necessary.
Finally
During this process of adjusting a carburetor do not get frustrated as it tends to be a bit of trial and error as you adjust the carb settings until the engine runs smoothly. There are times when simple adjustments and cleaning do not solve the carburetor problems, and then you will need to go the complete rebuilding or replacement process.
thank you for the article