
A driveshaft is one of the critical links between the engine and getting the power to the tires. Replacing the driveshaft correctly can be the difference between a smooth ride and one where the car shakes or even worse the driveshaft fails. If you are replacing a damaged driveshaft or installing a new one when changing the transmission, the steps are the same. Replacing a driveshaft is a DIY project that can be easily done in your home garage.
The driveshaft is what makes any vehicle move by connecting the rear differential to the car’s engine and transmission. It is a mechanical component shaped like a tube or cylinder which allows the transmission to power the differential. This is how the rear wheels of a standard car can move in the first place.
If your reason to replace a driveshaft is a vibration when driving the car, before going thru the steps to replace; first inspect the entire drive line for any damage. You may be able to avoid replacement if the u-joints have failed, bearing wear, and even issues with the rear differential may be causing the issues you feel or hear.
The procedure for replacing a driveshaft will vary, depending on the year, make, and model of the vehicle. Because of this, it is important to consult the replacement instructions for your application in a repair manual.
Determine the Correct Size
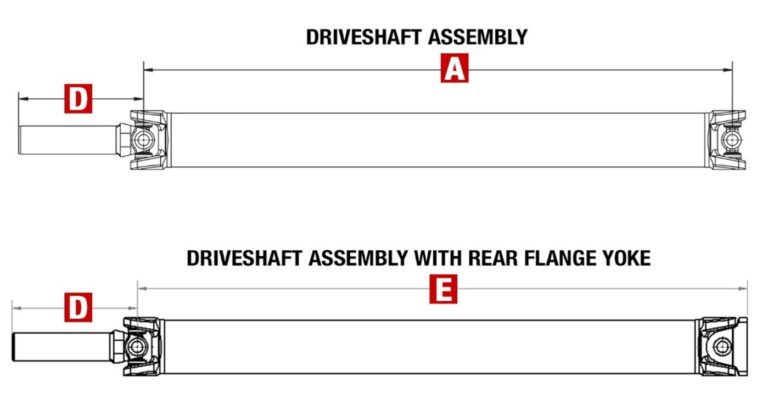
The diagrams below will help you get the right measurements for ordering.
***The first thing to do is make sure the vehicle is at ride height when taking your driveshaft measurements. All measurements must be within 1/16”.
Measuring Your Driveshaft Assembly:
A – Distance from the center of the front U-joint to the center of the rear U-joint. Take this U-joint center-to-center measurement with the slip yoke in its operating position. The slip yoke operating position is typically determined by pulling the slip yoke out of the transmission one” after it’s fully bottomed out.
D – Distance from end of slip yoke to center of front U-joint.
Measuring Your Driveshaft Assembly With Rear Flange Yoke:
E – Distance from center of front U-joint to end of flange yoke.
D – Distance from end of slip yoke to center of front U-joint.
Determining Length When You Don’t Have A Driveshaft To Measure:
A or E are required measurements for ordering a driveshaft. This is because of variations in transmission type, where the barrel of the slip yoke may or may not bottom out inside the transmission. If you do not have a driveshaft to measure, you can determine A or E by measuring with the slip yoke that you will be using.
But for a general overview of what replacing a driveshaft typically involves, check out the information below:
Tools and Equipment Needed to Replace a Driveshaft
The tools needed to replace a driveshaft will vary, depending on the type of vehicle you have.
In general, however, you will need:
- Chassis grease
- Fluid catch pan
- Ratchet and socket set
- Repair manual or access to a repair database
- Safety glasses
- Torque wrench
- Wheel chocks
- White Out (also known as Liquid Paper)
- Wrench set
- Floor jack and stands
Although the entire driveshaft rarely fails, its bearing and joints can wear out over time.
Now, let us get started replacing your driveshaft. The following steps are general guidelines for educational purposes will give you an idea of what the job typically entails. Consult your vehicle’s factory information for specific repair instructions and recommended safety procedures.
How to Remove a Driveshaft
- Put on your safety glasses.
- Safely raise and support the vehicle using a jack and jack stands. Set the parking brake and chock the rear wheels.
- Use White Out to make alignment marks between the driveshaft and the differential’s pinion flange, as well as the driveshaft and the transmission or transfer case. You will need to know the driveshaft’s position in relation to the rest of the drivetrain to reinstall the driveshaft properly.
- Put a fluid catch pan under the output seal at the end of the transmission or transfer case. A small amount of fluid may leak out of the seal area when you remove the driveshaft.
- Remove the fasteners and yoke retainers that secure the driveshaft to the differential’s pinion flange.
- Slide the driveshaft forward to disengage it from the pinion flange.
- Lower the driveshaft to slide its yoke out of the transmission or transfer case.
- Remove the driveshaft from the vehicle.
How to Install a Driveshaft
- Compare the new driveshaft to the old driveshaft to ensure both are the same design.
- Apply a light coat of chassis grease to the slip yoke splines.
- Reinsert the driveshaft’s yoke into the transmission or transfer case by sliding it over the output shaft. Make sure that the alignment marks you made earlier match up with the same location on the new driveshaft.
Note: Be careful not to damage the output seal while inserting the yoke into the transmission or transfer case. - Pull the driveshaft back toward the pinion flange and mount it in place.
- Reinstall the fasteners and the yoke retainers that secure the driveshaft to the differential’s pinion flange. Make sure that the alignment marks you made earlier match up with the same location on the new driveshaft.
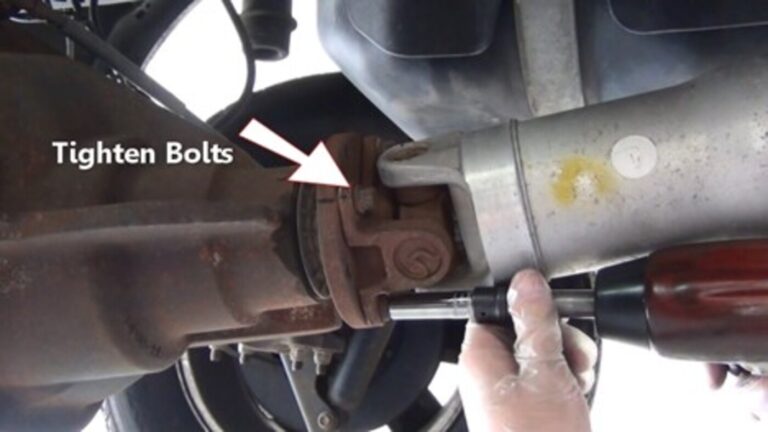
- Use a torque wrench to tighten the driveshaft’s fasteners to the manufacturer’s specification.
- Safely remove the jack stands and lower the vehicle.
- If a substantial amount of fluid came out while you were removing the driveshaft, check the fluid level in the transmission or transfer case and top it off as needed.
Finally
The procedure for replacing a driveshaft will vary, depending on the year, make, and model of the vehicle. Because of this, it is important to consult the replacement instructions for your application in a repair manual. In terms of labor, it should not take more than two hours. In most cases, it takes about an hour to replace a drive shaft.
I like that you said that when the driveshaft is replaced properly, the difference between a smooth ride and one where the car rattles, or worse, a drive shaft fails, can be significant. My father owns a vintage car that needs a Driveshaft Repair for it to function properly. I’ll make sure that he reads this article, thanks.