Bushings may seem small, but they play a crucial role in a car or truck’s steering and suspension systems. Steering and suspension bushings can deteriorate over time due to stress from constant movement, friction, heat and exposure to dirt and contaminants such as road salts and lubricants as well as time in storage. Since a worn or damaged bushing will negatively impact steering and suspension functions, it is important to inspect them regularly and bushing replacement whenever necessary.

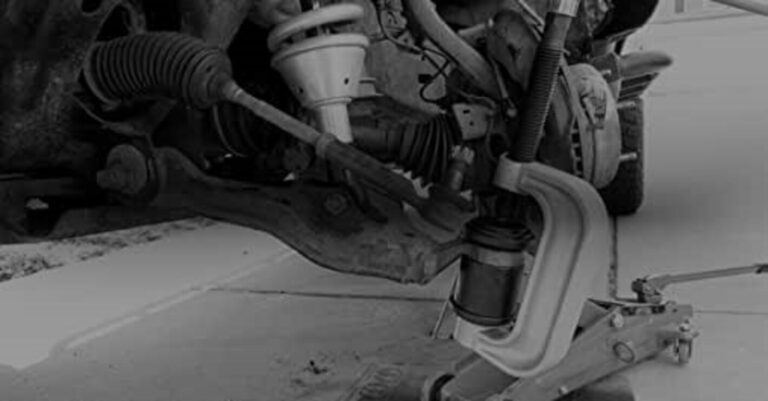
If you do not have access to a hydraulic press, as very few of us do, there is a simple and inexpensive alternative to bushing replacement on your suspension. If you do not have access to an auto parts store that rents specialty tools or are not willing to spend upwards of $100 to $150 for a bushing tool then using tools, we either have laying around, and a trip to the hardware store, we can build a homemade bushing installer/removal tool that will do the job quickly and efficiently. More importantly, the hardware cost was about $10. In this post, we will show you how to make your own bushing installer and give you some dos and don’ts to make your bushing replacement go as smoothly as possible. Also, for under $100 there are bushing tool kits made by bushing suppliers that can be had for working on GM four link systems.

Removing the OE Bushing
Before you can install your new bushing, you must remove the old one.
This method is designed for rubber suspension bushings. Polyurethane bushings do not need a torch and a fluid-filled bushing would be dangerous to remove in this manner. The correct way to remove a rubber suspension bushing with a torch is to slowly heat up the bushing from the outside. If you are not able to simply press the bushing out of the assembly with your tool and heating the component in increments; then using the torch to heat the housing that contains the bushing will eventually cause the rubber to boil, breaking its chemical bond with the outer metal shell. The melting point of rubber is about 350 degrees Fahrenheit, so all you must do is heat up the outer housing to transfer 350°F to the bushing, thereby causing it to boil.
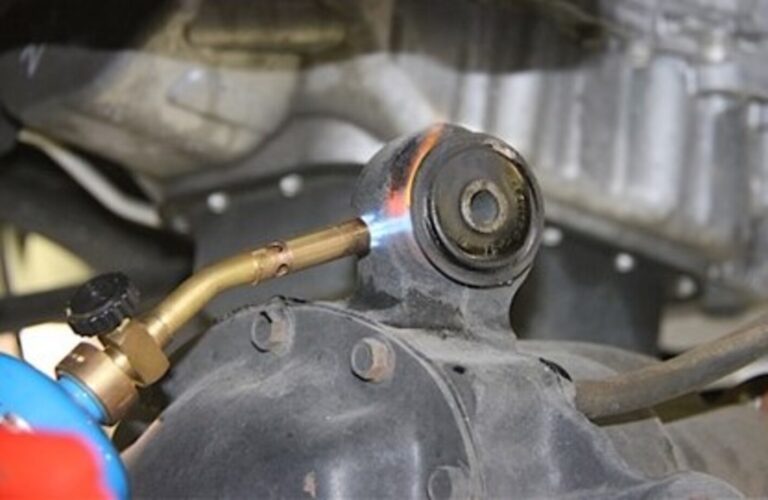
NOTE: The process of breaking the rubber bond takes several minutes to accomplish. Keep the torch on the housing until the rubber begins to boil. Apply the torch to all sides of the housing to heat all sides of the bushing. By applying that heat through the housing, you will protect the rubber from catching on fire. You do not have to get the housing cherry red hot and risk damaging the arm, it just needs to be hot enough for the rubber to boil. Speaking of boiling rubber, make sure you wear long sleeves, gloves, and eye protection.
Push out the Bushing with a Metal Tool

While the rubber is still hot, you can easily push out most of the bushing by pressing on it with a metal tool of some sort.
BE VERY CAREFUL when you push the bushing out. The rubber is extremely hot (umm it is boiling). You do not want it falling and hitting your arm or leg or your dog. So, take the proper precaution when pushing the hot rubber bushing out.
Bushing Replacement The Wrong Way: Melt the Bushing
Burning a rubber bushing is not simply excessively messy and dangerous, it is also extremely inefficient. Instead of simply heating the rubber up, you are trying to consume the rubber with flame. Additionally, rubber that is on fire can “pop” and “spit” little flaming balls of rubber “lava.” If you have ever been hit by that, you remember that painful experience.
SUPER IMPORTANT: Should you remove the OE Outer Metal Shell as part of your bushing replacement process?
This is the point where you need to stop and use your brain for a minute. Most aftermarket suspension bushings require the use of the original metal shell. The bushings are engineered in a two-piece design for a DIY friendly installation. Each half bushing pushes in from either side INTO the OE SHELL. So, before you get your hacksaw out, check the installation instructions with your replacement bushing. Once you remove the OE shell, there is no getting it back in if you need it.
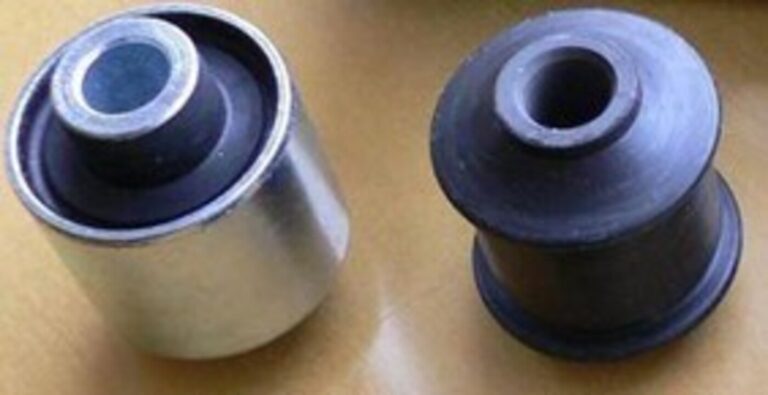
Bearing with sleeve vs without sleeve
If you need to reuse your OE metal shell, you can stop right here. If your new bushing has a new metal sleeve with it, keep reading to learn how to remove your OE metal shell.
Removing the OE Outer Metal Shell
Relieve the Tension with a Hacksaw
If and only if you are sure that you do not need to leave the outer metal shell in the housing (see above paragraph), you can go on to the next step. AFTER YOU HAVE COOLED THE HOUSING, whether by immersing it in water or letting it sit for a while, you can use a hack saw to cut a thin line through the outer shell to relieve the tension against the housing.
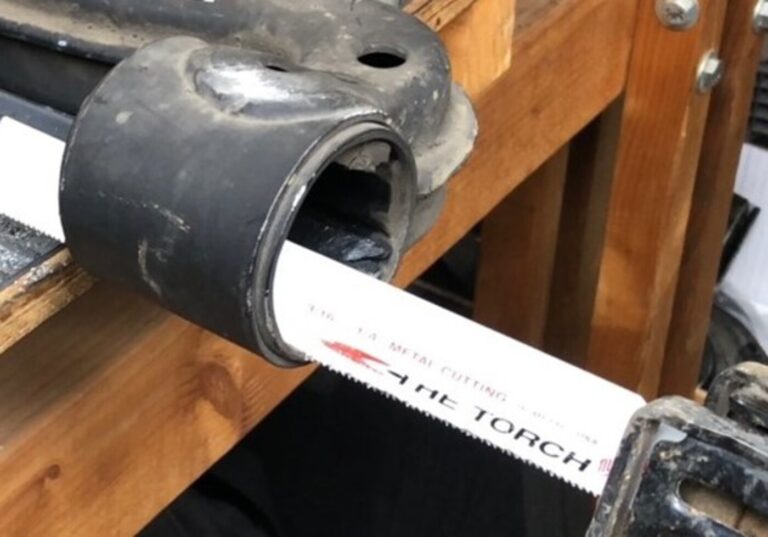
Slide your blade into the housing and attach it to the hacksaw.
You must be exceptionally careful not to cut into the housing itself. You only want to cut the old bushing shell. A thin line through the original bushing shell is enough to relieve the tension, which will allow you to remove the shell more easily.
Push out the Sleeve
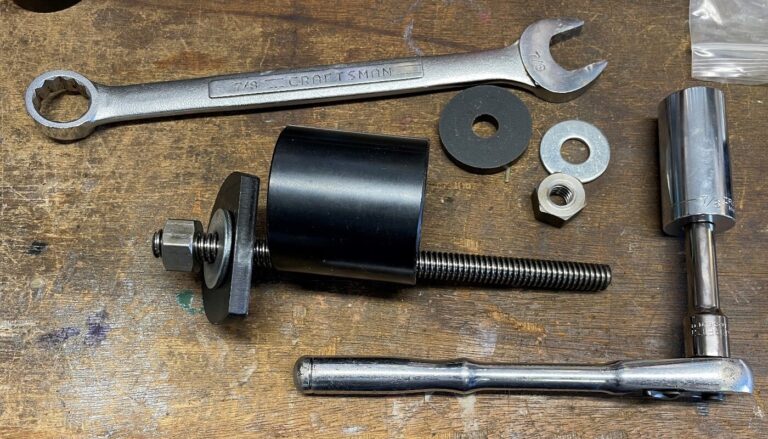
Once you have cut a thin line all the way through the outer shell, this should relieve most of the tension and friction that is keeping the shell in there. From here you can use something as simple as a hammer and punch to pop out the sleeve. We opted for a homemade bushing puller. Here are the pieces we used to build our homemade puller:
- a threaded rod
- a few washers
- piece of metal pipe
- two nuts
- two wrenches
Find a washer that is the same diameter as the outer shell. Then find a piece of pipe or large socket large enough to let you push the old shell into it. Thread one nut on each side of the rod until it reaches your washers. Tighten everything up until there is tension in the assembly, and then center your washers to make sure there is even pressure against the shell on all sides.
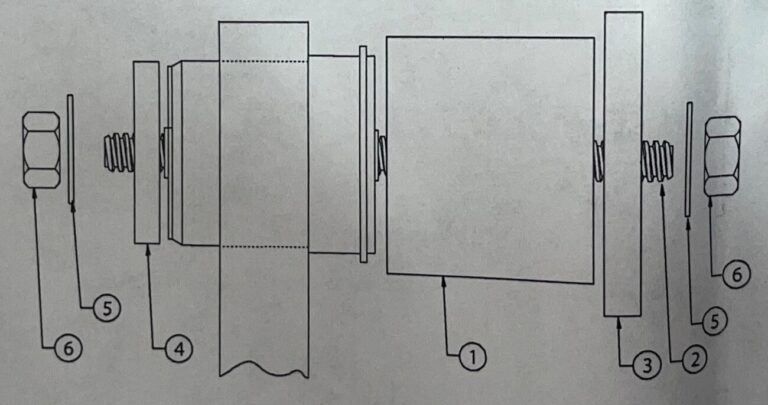
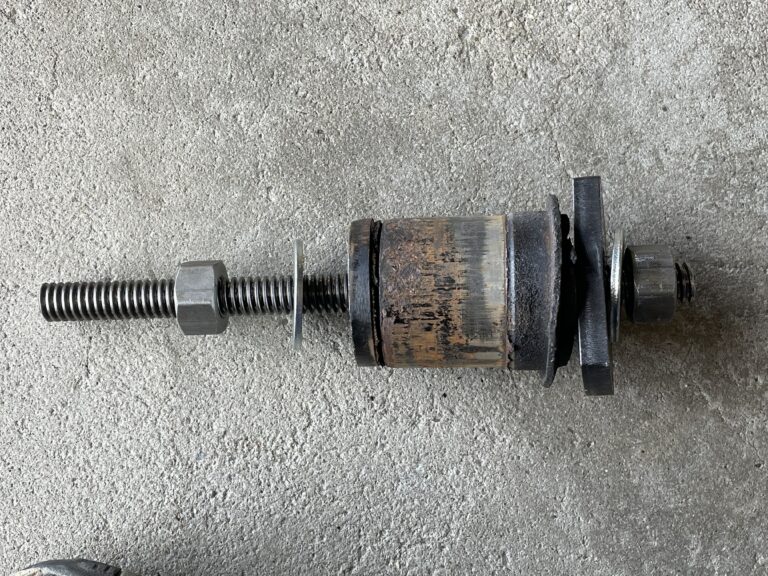
Check out this diagram for a detailed look at how our puller works:
You can make a homemade bushing puller with a rod, a pipe and a few washers and nuts.
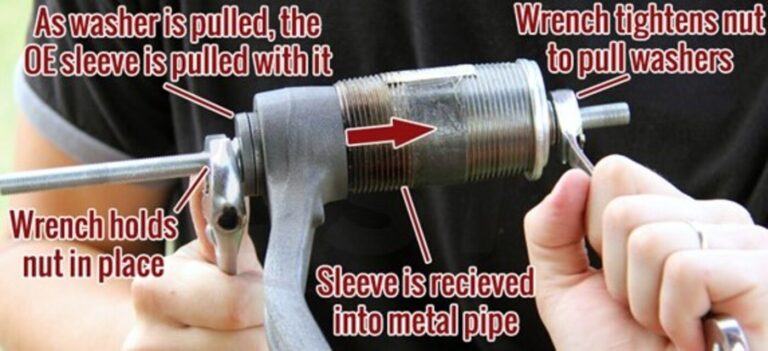
Use one wrench to hold one nut in place and use your second wrench to tighten the opposite nut. As you tighten the nut, your washer will press against the bushing sleeve while the metal tube presses against the outer housing on the other side. Keep torquing your wrench until the washer pushes the outer bushing sleeve into your metal tube.
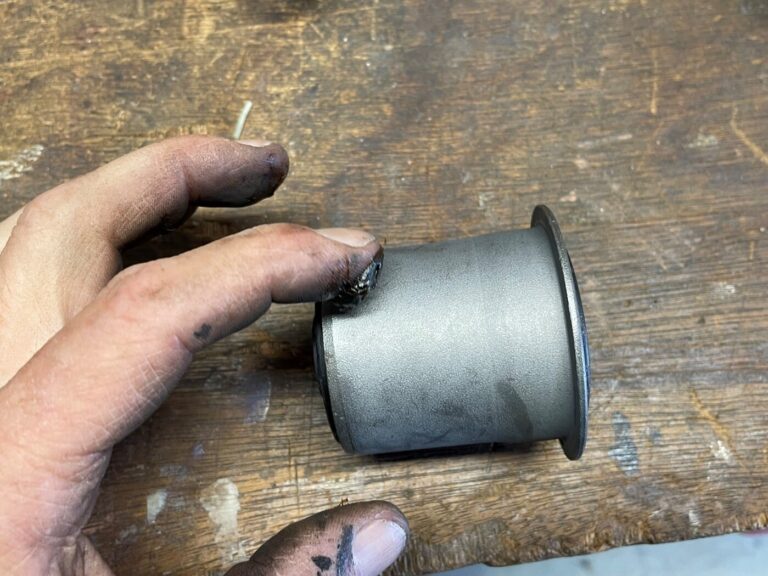
Clean the Housing of Sharp Edges
Now you have completely removed your old bushing from your arm! Before you install your replacement bushings it is a good idea to sand and polish the inner diameter to get rid of any sharp edges and clean up any corrosion that could damage your bushing as its being installed.
Removing any sharp edges will protect your new bushing from potential damage.
**Be sure to consult your installation instructions before you remove the outer shell, as a lot of aftermarket bushings require the use of the OE shell. ** But for those of you with bushings that have a new outer shell, please read below to see how we installed a bushing without a hydraulic press.
Sand and Polish the Housing
Once you have removed the OE bushing and shell, you should be left with an empty housing. It is a good idea to sand and polish the inner diameter of the housing before you install anything in order to clean up any corrosion, contaminants or rust that may have accumulated. The last thing you want is a sharp edge in there that damages your new bushing when you install it. Additionally, a clean and polished housing will reduce friction, allowing the new bushing to be installed more easily.
Bushing Installer Parts: Do’s and Don’ts
Once your housing is prepped, you are ready to build your bushing installer. Full disclosure: The first bushing installer we built failed, hard. It just was not strong enough to provide the force necessary to install the bushing. So, throughout the description of this installer, when we say “you don’t want to use” something, it is because we tried it and it failed.
Sockets or Pipe
We used a set of sockets and pipe because we had a set available, so if you have a socket set you can use that. But if you do not have one, and you do not want to go spend a hundred dollars on a nice set of sockets, do not worry. You can do the same thing with two pieces of 3-dollar metal pipe. You will need a piece of pipe with the same diameter as the bushings, and the second piece of pipe with a larger diameter that will brace itself against the housing you are installing the bushings into.
Important Notes about Nuts and Bolts
Now that you have your sockets or pipes, you need a threaded bolt to go through the entire contraption. A few important things about the nuts and bolts:
Use a Grade 8 bolt, not a Grade 5
A Grade 8 bolt can be identified very easily. On the head of the bolt, you will see a number of lines. If there are six lines on the head, that is a Grade 8, if there are 3 lines, that’s a Grade 5.
The first bushing installer we built used a Grade 5 All Thread rod. The threads on the Grade 5 were too soft and failed under pressure when we were installing the bushing into the housing. When we switched to a Grade 8 bolt, we wondered why we ever tried anything else.
Use a Coarse thread, not a Fine thread
With our brilliant minds (sarcasm) we thought surely to use a fine threaded rod. The more threads there are the less force needed to complete a turn on a thread. Thus, reducing the amount of strength required to push the bushing in. That was the thought anyway. But in practice, the fine threads were weaker and failed under the stress. A coarse thread is stronger and more durable for a task that requires as much force as installing a bushing.
Use the largest diameter bolt allowed
This bolt will have a lot of stress on it to install the bushing, so you will need a beefy bolt. But this bolt will have to fit through the inner sleeve of your bushing. Be sure to get the largest diameter bolt as allowed by your inner sleeve size.
Long Grade 8 Bolts usually have little threading
Now this is where we had to stop and put our thinking caps on. The whole point of the bushing installer was to tighten two nuts, causing the sockets to push against the bushing on one side, and the housing on the other, pushing the bushing into the housing. So, we needed a threaded bolt that would allow us to torque the bushing all the way in. Therefore, we originally used all thread rod, lots of threads. But once that failed, we tried to find a Grade 8 bolt that would work. Unfortunately, the Grade 8 bolts at our local hardware store had a short thread length. Once we threaded the nut down to where it touched the socket, we had one or two turns of thread left. After we pouted for a minute, a lightbulb came on. Washers! Using a stack of washers as shims we were able to use the entire thread and then some. Once we torqued the nut to the end of the thread, we took the nut off and added more washers to reset the bolt to the end of the thread.
Use a tall nut or course threaded rod
The taller the nut, the more threads the nut has. Our first nut was short. When we switched to Grade 8, we had to switch nuts as well. The taller nut had more threads, allowing the force to spread on a larger portion of the bolt, putting less stress on each individual thread. Now all you need is two wrenches (or one wrench and pair of vice grips), and you have your home-made bushing installer.
Tips and Tricks before you Install
Before you start torquing there are a few other tips and tricks you can use to make your install smoother.
Lubricate the bolt
This was a critical step in our success. The first go around we did not lubricate the bolt. The nut got hot (to the touch) because of all the friction. That heat softened the metal, making the rod not only too weak to install the bushing, but we destroyed the thread. On the grade 8 bolt, we lubricated the thread. It reduced friction, which reduced the heat, allowing the metal to stay strong.
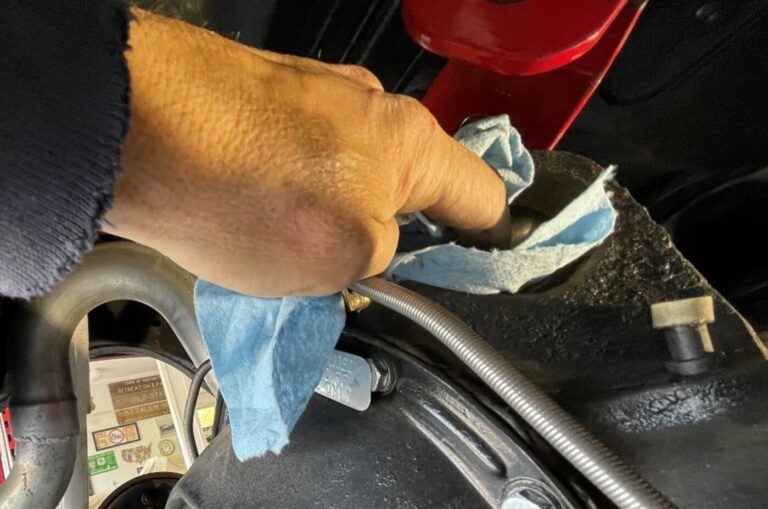
Lubricate the housing with oil
We also lubricated the housing with oil. The oil helped the bushing slide in by reducing friction. Additionally, a coat of oil will protect your freshly polished metal from corrosion.
Freeze the bushing
Huh? Yes, you read that right. Science backs it up. Metal contracts in the cold. We put the bushing in the freezer for 24 hours before the install to help contract the bushing. Now it did not make the bushing just drop in, but even the slightest decrease in the bushing diameter can make all the difference.
Installing the Bushing
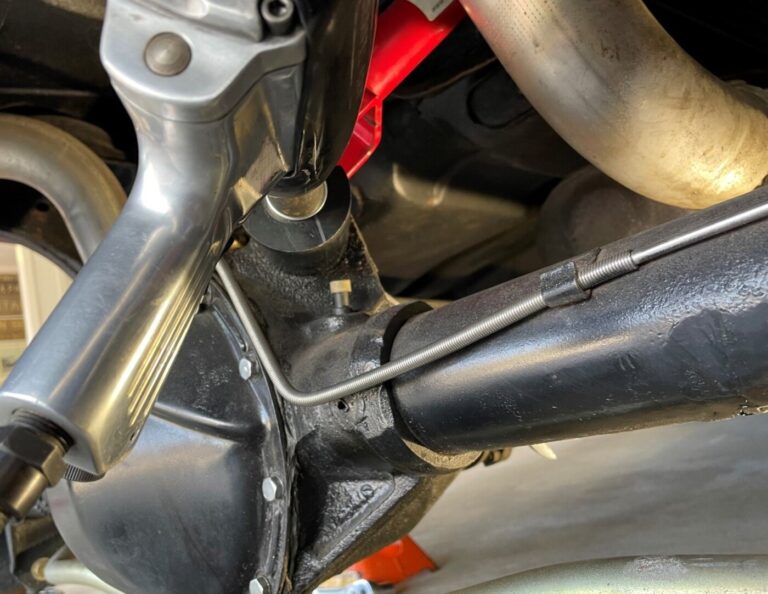
Now you are ready to install. Use a wrench or vice grips to hold one of the nuts tight. Then torque the other nut with a wrench. As the socket pushes the bushing, the opposite socket acts as a brace, pressing up against the housing pressing the bushing into the housing. After a few minutes, the bushing was entirely in the housing, all without a press.
Once we had the right tools, the process was quite simple. We even used the same tool to remove the bushing and then put it BACK in. It is really all about having the right tools. So, if you are having trouble installing your bushing with your homemade bushing installer, remember:
Finally
There are plenty of YouTube videos available for specific classic vehicles addressing the steps for bushing replacement. We are providing an over all guideline on bushing replacement to show that the DIY mechanic can undertake the challenge with the either rented tolls or simply making your own puller/press.
Making sure you have the proper tools for the bushing replacement job is key to your success. But do not forget these helpful tips and tricks:
- Take Your Time and Follow the Steps
- Put Heat Only in All the Right Places
- Lubricate the Bolt Threads
- Lubricate the Housing
- Freeze the Bushing