Front disc brake conversions of a vehicle’s drum brakes to disc brakes is a challenging process. It requires a solid understanding of automotive maintenance and repair, as well as a wide array of tools. However, that is no reason to be discouraged. Follow the simple steps below.
There are two types of front-disc brake-conversion kits: Those that require you to change the spindle and those that do not. Changing the spindle is a job in of itself, so this project will cover the steps required for installing a kit that does not require changing the front spindles.
The exact procedure to complete this upgrade will depend on what car you have (Camaro, Firebird, Charger, Challenger, Mustang, Comet, etc.) and its year of manufacture. The basic procedure for any car that came from the factory with front drum brakes without replacing the front spindles is as follows.
What You Will Need for Disc Brake Conversion
Disc Brake Conversion Kit
Master Cylinder
Jack and Jack Stands
Lug Wrench
Sockets
Wrenches
Pliers
Torque Wrench
Flare-nut Wrench
Lubricants and Wheel Bearing Grease
Brake Fluid
Threadlocker
The Disc Brake Conversion Set Up
Park the car on a flat and level surface like that of your garage. Block the rear wheels and loosen the front lug nuts a turn or two with the lug wrench. Place the jack under the center crossmember and raise the front wheels off the ground.
Place the jack stands under the frame on both sides of the car behind the front wheels and carefully lower the car onto the stands. Remove the lug nuts and the front wheels.
Disc Brake Conversion Preparation
Begin by locating the master cylinder of your car. Drain about half the brake fluid from it. Dispose of this fluid properly and be sure to have fresh brake fluid on hand. Next, loosen the lug nuts on the wheel you intend to remove the brake drum from. Using the jack or car lift, raise up the vehicle and make sure it is safely supported. Now remove the tire.
The Disassembly
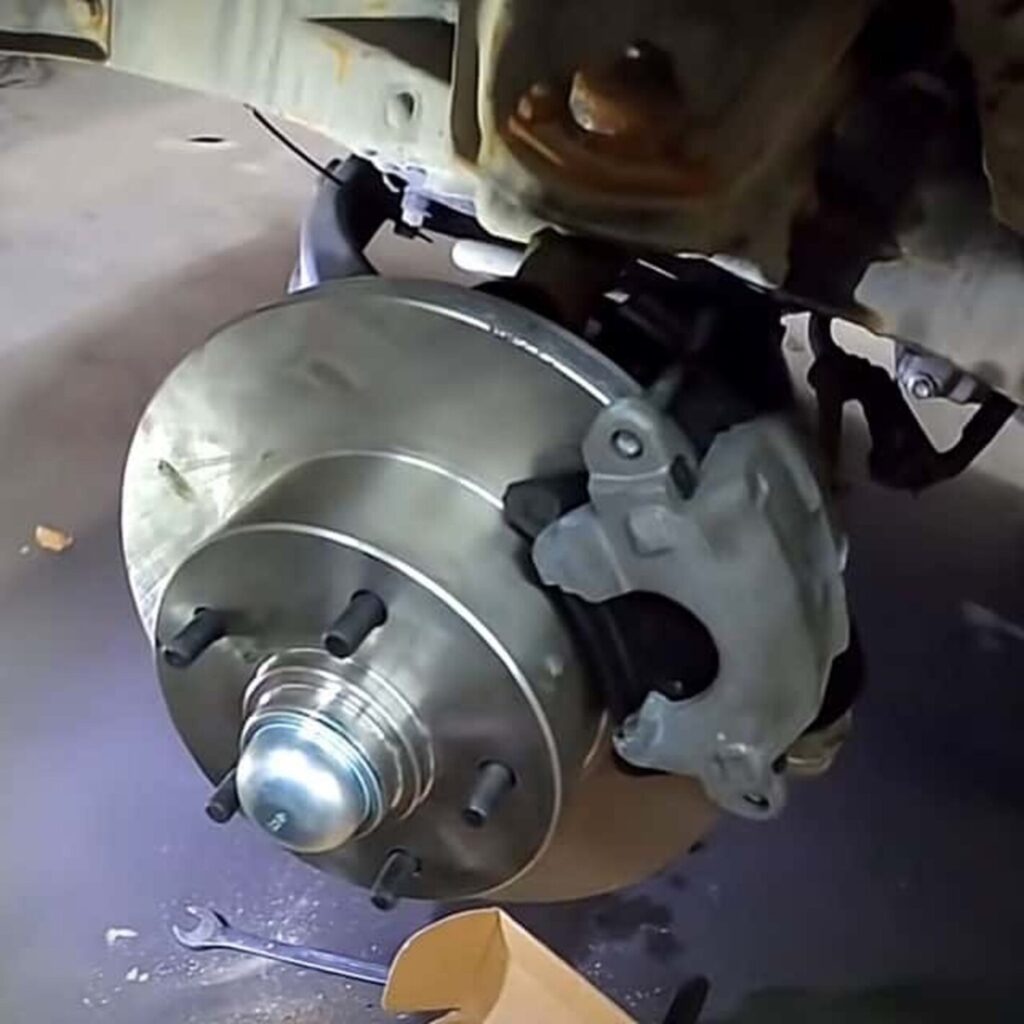
Remove the dust cover from one of the front hubs and set it aside. Remove the cotter pin with the pliers. Remove the castellated nut cover (the thing that looks like a giant bottle cap). Using the appropriate pliers or wrench, remove the hub-bearing nut. Place these items in the dust cover so as not to lose them.
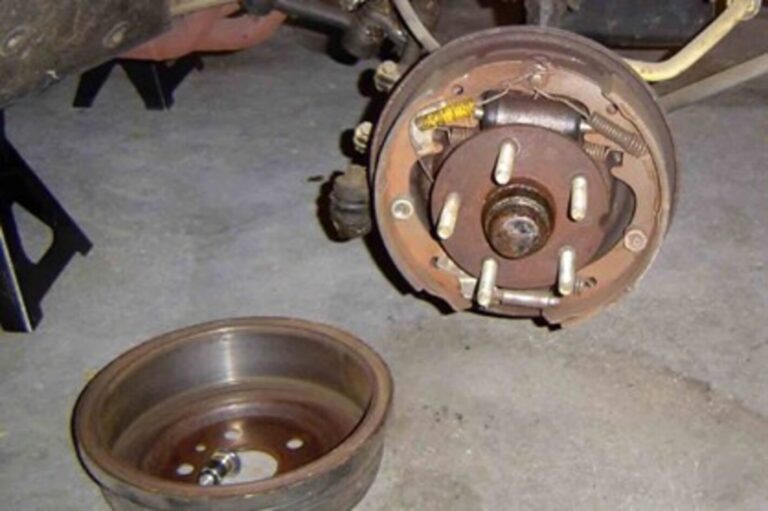
Grasp the inner ridge of the brake drum and pull toward you firmly. You may need to pull quite forcefully (especially on an older vehicle that has not been driven for some time) or even hit the drum around its circumference with a hammer a few times to get it loose enough to remove. This exposes the inner workings of the front drum brakes. Disconnect all springs that keep the brake shoes in place. If you see the parking brake cable, this will need to be removed as well. The brake shoes should be removed together by lifting them away from the centered position. Now take off any remaining hardware attached to the brake shoes, including the adjusted spring, screw assembly, or retainer rings.
TIP: Loosening the brake line inlet at the back of the wheel where it connects with the wheel cylinder or where that line connects to the steel hard line can help in releasing pressure against the brake drums from the shoes. Remove the four bolts securing the backing plate to the steering knuckle/spindle assembly.
Using an aerosol brake cleaner, thoroughly clean the spindles and knuckle/steering arm, paying close attention to bearing surfaces for nicks and scratches. If nicks and scratches are found on the bearing surfaces, the spindle(s) will have to be replaced.
Assembling the Disc Brake Conversion
Mount and torque the caliper adapter bracket as outlined in the kit. Some kits will have you remove the upper ball joint bolt and a bolt from the steering arm while others will have you remove other bolts. Most GM F-body kits will mount this adapter to the upper ball joint retainer and the steering arm bolt.
Packing the new bearings with grease, and install them and the seals in the new hubs. You can either use a bearing packer or you can pack the bearings by hand by pushing the side of the bearing into a puddle or pool of grease in the palm of your hand until the grease comes out the opposite side. If packing the bearings by hand, be thorough and make sure that all the dirty, worn grease is purged from the bearings. Also, make certain you are using the right type of high-temperature grease for the job.
Set the new bearings into the new hub and install the grease seal. The larger bearing goes into the rear of the hub assembly, tapered side down. The seal is them installed with several sharp raps of a hammer, open side down. Be sure the seal is seated evenly—you might try putting a block of wood over the seal, then striking it with the hammer to drive it in evenly.
Assemble the rotor to the adapter and then to the hub assembly. Hold the rotor and adapter plate against the rear (inside) of the new hub assembly and attach the rotor to the adapter and the adapter to the hub with the included bolts. A dab of Threadlocker Blue or Green ensures that these bolts do not loosen due to vibration. Be sure to torque these bolts as specified.
Slide the assembled hub and rotor assembly onto the spindle and check for clearance between the rotor and the caliper mount installed above. Shim the caliper mount as needed so that the rotor and caliper mount are parallel.
Secure the hub assembly to the spindle by sliding the packed smaller bearing onto the spindle, followed by the keyed thrust washer removed above. Tighten the nut so there is no play in the bearing. Slide the locking cap over the spindle nut and lock in place with the new cotter pin.
Install the dust cap. The dust cap on some disc brake conversions will be screwed into the hub assembly, while others are installed simply by tapping the dust cap into place with a hammer.
Install the new calipers on the mounts with the supplied hardware. You may or may not need to use the included shims to get the caliper to align properly with the rotor. Using Red Threadlocker, torque the caliper bolts to the specified torque. Make sure the bleeder screw faces up.
TIP: Some kits will have you install the wheel studs yourself while others will have the studs pre-installed for you. Additionally, some of the kits that require you to install the new wheel studs and have an installation process that is as easy as threading the studs into place and torquing them down while the wheel studs must be pressed in with other kits. If this is the case with yours, you may have to have that performed at a machine shop.
Brake Master Cylinder Conversion
Remove the stock master cylinder by removing the two brake lines and the two bolts mounting the master cylinder to the firewall or brake booster. Be careful not to spill brake fluid, as it will destroy paint almost instantly.
Fill and bleed the new master cylinder. Bleeding the new master cylinder can be done on a bench or on the car. Install the master to the booster or firewall with the original nuts/bolts and tighten accordingly.

TIP: Master cylinders for drum and disc brakes are different. A master cylinder for disc brakes must take some of the fluid in the lines back when the brake pedal is released. This allows the caliper pistons to retract and allows brake pads to “float” off the rotors when the brakes are not applied. Without this feature, disc brakes would drag.
Attach the two bleeder tubes that came with the new unit and fill both reservoirs with brake fluid. Have someone slowly press the brake pedal while watching until no more bubbles come out of the tubes. Make sure you keep the reservoir full.
Attach the brake lines to the master cylinder. We recommend using flare wrenches so as to not damage the fittings on the brake lines.
Assembly Finish Work
Install new rubber brake lines to the new calipers and bleed the system. Once the new hoses are attached, have someone pump the brake pedal a few times and hold it while you slowly loosen the bleeder screw on the passenger side rear wheel, with tubing running into a jar with clean brake fluid in it. Repeat the process on the driver side and then move to the front, passenger side first. Make sure you keep the master cylinder full.
Install and torque the wheels. Slide the wheels over the wheel studs and run down the lug nuts as much as possible by hand. Move the jack under the center support and raise the car off the jack stands. Remove the jack stands and carefully lower the car until the wheels contact the ground. Properly tighten the lug nuts with the lug wrench and finish lowering the car.
Finally
Double check your work, making sure all nuts, bolts, and caps are securely fastened. Refill your master cylinder with fresh brake fluid to replace the amount you extracted in the disassembly process. Take the car for a test drive, paying attention to the feel of your new brakes. If they feel spongy or unresponsive, you may need to bleed them further.
While converting your vehicle’s drum brakes to disc brakes requires patience and attention to detail, it is ultimately rewarding, both for you and your car. Not only will your new brakes be more powerful and effective, but they will also prolong the life of your vehicle.
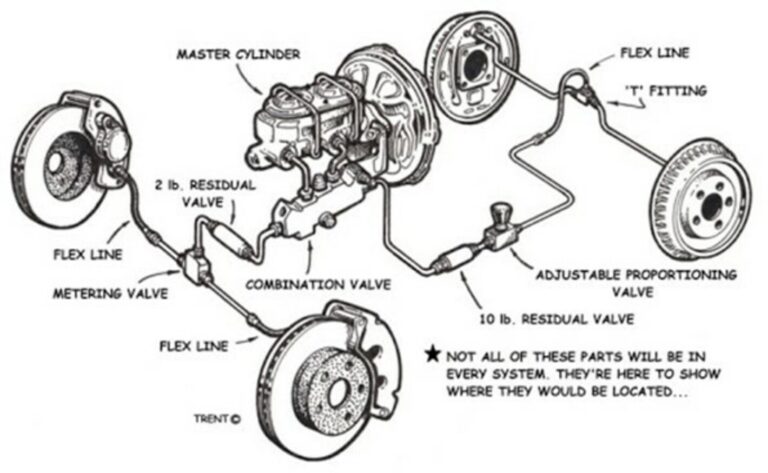
If the brake lines and diverter valve on the car are working properly, you will now have the safety and ease of use of disc brakes on your classic car.
It is hard to do this things if someone doesn’t have proper knowledge. You have given a visualization for a proper understanding. As I am an engine mechanic, I had little knowledge about it. But now i have a clear vision toward this conversion.