
Headlights that are not properly aligned can impair the vision of other drivers by shining into their mirrors. Among other things, correct headlight alignment is important for your own safety and ability to see signs or obstacles on the road. With the steps below and your owner’s manual, you can feel confident that your car headlight adjustment will do what they are intended for without causing harm to other drivers or yourself.
Let us face it—halogen and incandescent headlight bulbs are a thing of the past. LED headlight bulbs are the long-lasting alternatives to older styles; in fact, they can last the life of your vehicle! That is right, it is not just a “pop the bulb in and you are done” kind of thing. It is important to know how car headlight adjustment not only when you replace them, but also if your vehicle has had anything done to it that might throw off car headlight alignment. Too much weight in the back of a vehicle, lift kit installs, accidents, and worn shocks are some things that can lead to misaligned headlights.
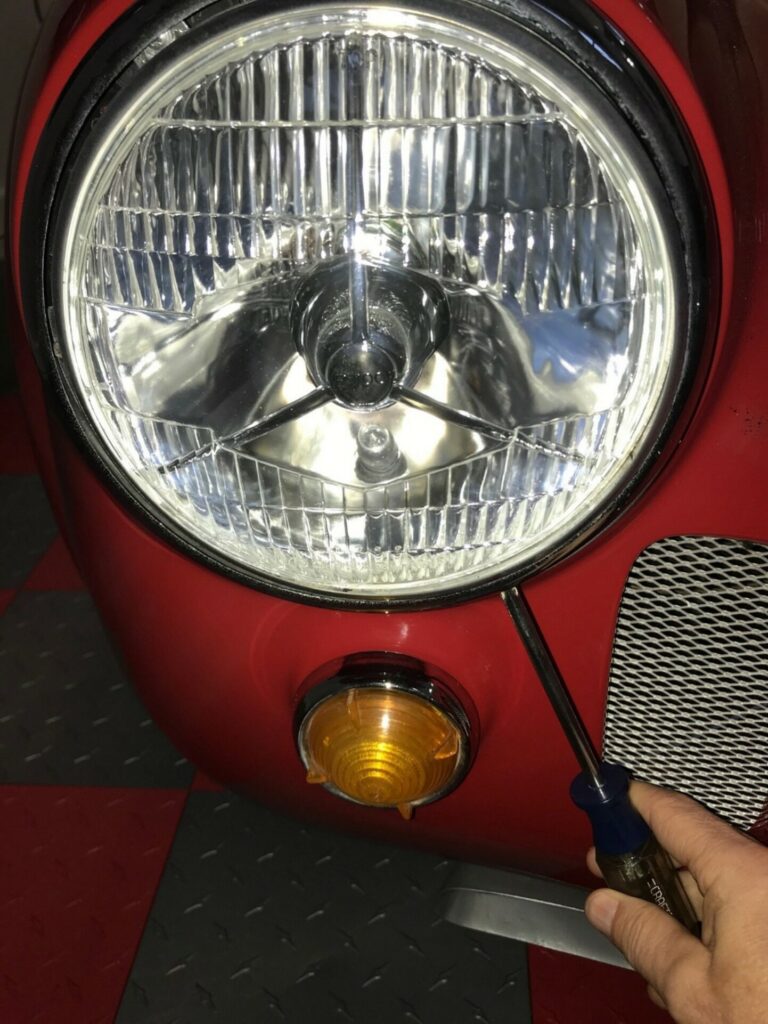
To adjust your headlights, you will need a ratchet or screwdriver that matches your classic car’s headlight adjusters. Headlight adjusters are in different locations on every vintage vehicle. You can check your owner’s manual to find them or look for the car headlight adjustment screws adjacent to or behind the headlight. On many classic cars there is a chrome or metal bezel around the headlights which will need to be removed first. Once you know what kind of screws your vehicle has, you will be able to choose an appropriate tool.
In addition to a ratchet or screwdriver, you will also need:
- A measuring tape
- A dry erase marker
- Painter’s tape
- A wall or flat surface
- A piece of cardboard or jacket thick enough to block light
- At least 25 feet of space
STEPS TO AIM YOUR HEADLIGHTS
Note: It is important to replace headlight bulbs in pairs as beam style, brightness, and color temperature vary.
For you to properly align your headlights, your vehicle should be on level ground and clean. You can adjust your headlights inside or outside using this step-by-step process:
- Prepare your vehicle: Make sure your tires are filled to the appropriate air pressure and that you have around a half tank of gas (the weight of the fuel will adjust the vehicle’s stance, and you are more likely to have between 1/4 and 3/4 tank of gas than you are an empty or full tank). If you regularly carry around heavy equipment or supplies, place them in the vehicle as well.
- Find the headlight axis: With a dry erase marker, draw a small dot in the center of each headlight. This is the headlight axis. Make sure to mark the center of the regular lights, not the high beams.
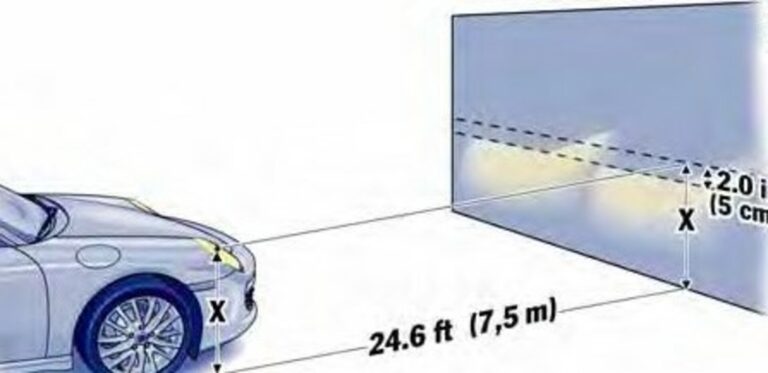
- Park your vehicle: Park your vehicle right in front of a level wall or flat surface — this could be your garage wall, garage door or a wall in a parking lot. You should have enough room to back up 25 feet in a straight line from the spot.
- Settle the suspension: Bounce the vehicle a few times on all four corners to allow the suspension to settle.
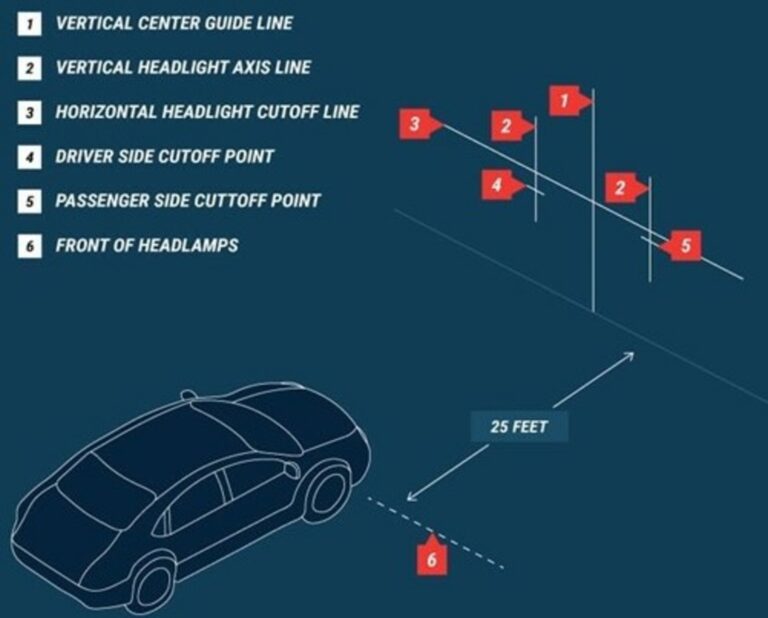
- Create a center guide: Using a piece of painter’s tape, put a vertical mark on the wall or garage door in line with the center of your vehicle. Do not worry about precise measurements — this mark will just serve as a guide. A hood ornament or front license plate can be helpful for determining this.
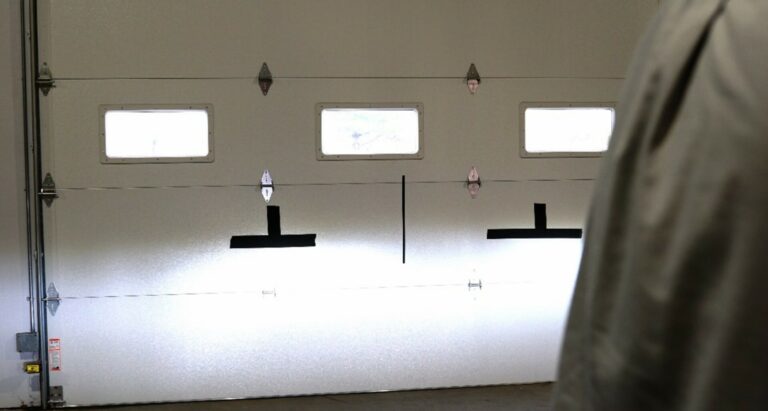
6. Mark the headlight axis on the wall: Place a vertical strip of painter’s tape on the wall in front of each headlight axis. The axis dot should line up with the center of the tape.
7. Measure the height of the headlight axis: Using your measuring tape, measure from the ground to the headlight axis, using the dot as a guide.
8. Mark the height of the headlight axis on the wall: Measure up the wall and make a mark on the tape at the height of the headlight axis.
9. Find the headlight cutoff lines: On the driver’s side of the wall, measure four inches below the axis height you marked and draw another line. On the passenger’s side, draw a line two inches below the axis height. These marks will serve as cutoff points when you adjust your lights. The driver side mark is lower than the passenger side mark to reduce the glare seen by oncoming drivers.
10. Mark the headlight cutoff lines: On each side of the wall, place a horizontal strip of painter’s tape above each cutoff line, making sure it is level. The bottom of the tape should line up with the drawn cutoff line. This step makes it easier to see the cutoff from a distance.
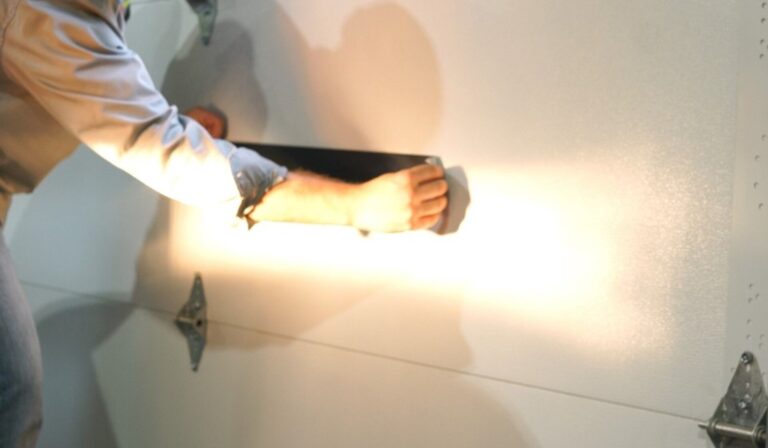
11. Back your vehicle up: You are ready to adjust your lights now. Back your classic car in a straight line away from the wall. The front of your headlights should be 25 feet from the aiming wall chart you have created.
12. Turn on your lights: Turn off your garage lights or any other light source and turn on your vehicle’s headlights to compare their alignment to the guide. If you are adjusting your headlights outside, you will need to do this work at night.

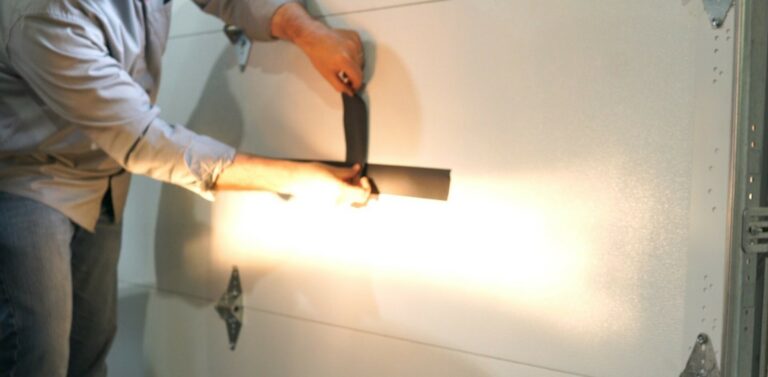
13. Car headlight adjustment: Use a piece of cardboard or a jacket to block one headlight. Then, use your ratchet or screwdriver to turn the other light’s vertical adjuster screws, being careful not to lean on the vehicle. Turn the screw clockwise or counterclockwise until the top of the light lines up with the bottom of your adjustment chart’s cutoff line. When the lights are aimed properly, everything above the horizontal tape will be dark. Repeat the process on the other side. If you notice that your lights are horizontally out of alignment, follow a similar process using the horizontal adjustment screws, to adjust them back to center.

14. Check the alignment:Remove the cardboard or jacket from the covered headlight and check the finished alignment. The beam from the driver’s side headlight should sit a bit lower than the one from the passenger’s side. This setup gives you proper visibility without blinding other drivers.
15. Test your lights:After you have set your headlight alignment, take your vehicle out for a test drive to make sure the lights provide proper visibility.
Whether you are converting your classic car lights to a modern bulb, a restoration, or even doing suspension work you will need to readjust your headlights to get the proper light on the road where you need it.
I think what you posted made a ton of sense. But, what about this?
what if you added a little content? I am not suggesting your content isn’t good, but
suppose you added something that makes people want more?
I mean Classic Car Headlight Adjustment Guide – Classic Auto Advisors is
a little vanilla. You might peek at Yahoo’s front page and watch how they create news titles to get people interested.
You might add a related video or a pic or two to grab
people excited about everything’ve got to say.
Just my opinion, it could make your posts a little livelier.