
Making your ride stop better is hardly the coolest way to soup it up. Whether you are a tuner-car enthusiast looking to make your Nissan 240SX drift-ready or the average guy looking to tweak the safety and performance of your beloved ’65 Chevrolet Impala, a disc brake conversion is actually the first modification you should consider.
There are many good reasons to ditch your old-fashioned drum brakes for discs. Drum brakes can be troublesome; they are easily damaged by heat, moisture, and debris, they offer less-than-optimal stopping power, and they often need regular adjustment.
The obvious candidates for disc brake conversions are pre-1970 vehicles, since disc brakes did not become standard until the ’70s. Chrysler introduced standard disc brakes in the 1950s, but this innovation didn’t catch on until the mid-1960s, when power brake systems, which made disc brakes easier to operate, hit the market. But even most modern cars and trucks still come standard with drums on rear wheels. Rear drums have stuck around mostly because they are cheaper than disc brakes, and since a car’s front brakes do 70 percent of the work, rear brake performance can be sacrificed for cost.
We will look at the basics of brake conversion, including the tools you will need to do the job yourself, the difference between front and rear conversions, and the kits available to save yourself a trip to the junkyard.
If you know your calipers from your spindles, you probably have the expertise to do the brake conversion yourself. But do you have all the tools you need?
Tools For Disc Brake Conversion
Since you are either savvy enough or foolhardy enough to attempt a brake conversion yourself, your garage is probably already stocked with all the tools you will need to assemble your disc brakes. But putting your new brakes on is not going to be the hard part. Taking off your old brakes will probably pose the biggest challenge.
Maybe your bolts have not fused and rusted, and maybe all the lubrication has managed to not dry up and blow away. If you happen to be that lucky, then a socket set and a torque wrench will certainly do the trick. Just in case you are not that fortunate, it is probably best to prepare yourself for some resistance. So, make sure you have some penetrating oil, a sledgehammer, a hacksaw, or an acetylene torch on hand.
There are dozens of factors that can complicate your brake conversion — all depending on the make, model, and year of your vehicle. You may need to remove springs, shocks, and possibly even an axle in order to get this job done, so make sure you know what you are in for before you get too far in the process.
As for putting the new brakes on, conversion kits have everything you will need to put your new brakes together, but if you’re shopping at the local junkyard, you will be taking brakes off the donor car in addition to your own, so make sure you are tooled-up for another possible struggle.
Front- and rear-brake assemblies are not interchangeable, so front and rear conversions do differ slightly. Read on to find out what is required for each, and what complications you may encounter.
Though rare; before starting the conversion process verify that the rims you have or want to use will fit once the disc brake assemblies are installed on your classic car.
WHERE TO GO FOR HELP
For knowledge, advice and guidance, the Internet is definitely your most useful tool. A quick search through the forums section of any classic car enthusiast site could likely take you to a posting by someone who has already done the very conversion you are about to attempt. If not, you can post your questions and concerns and wait for a response. For vehicle-specific assembly instructions, consult the Chilton or Haynes manuals.
Front Disc Brake Conversion
If you are doing a front disc brake conversion, you are probably working on an older vehicle. This may mean that you will have to do more than simply replace the old brakes.
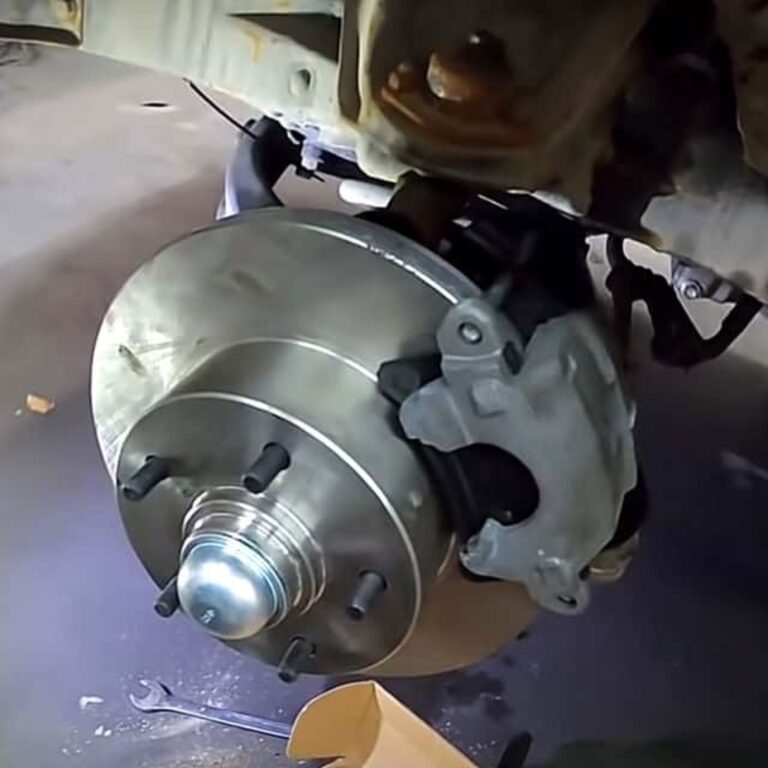
Removing the Drum Brakes
Not all drum brakes are created equal, but they are all similar enough that removing them follows the same basic steps. Start by removing the wheels and tires. Next, you will need to take off the dust cap, and then remove the center nut, washer, and brake-drum bolts.
Disconnect the brake hose before you remove the drum, and once you have taken the drum off, you should inspect the spindle. If the spindle is worn or rusted, you should replace it. But if it looks good, you can clean it up and reuse it. Now just reposition and secure the steering arm and you are halfway to the finish line.
Installing the Disc Brakes
Some brake conversion kits come pre-assembled, but assuming yours is not, or if you are using recycled parts, here is how you can assemble your disc brakes. Attach the rotor to the spindle and then put on the bearing and nut, the washer and the cotter pin. Now put on the dust cap, and then you can move on to the caliper assembly.
Before you put the caliper on the rotor, attach the new brake lines and install the pads. Then you can put the caliper in position over the rotor, reattach the brake lines and then back go the wheels and tires.
After you have finished the conversion, you will need to bleed the brakes and refresh the brake fluid. Bleeding the brakes will flush out any air that has gotten into the brake line. And since you have disconnected those lines, there will be air inside. This can cause your brakes to feel spongy or can make your pedal dip close to the floor. It is strongly recommended that you take this opportunity to fully flush the brake fluid by bleeding the brakes until the new fluid is seen in the coming out form the bleeders.
Let us move on to how to do a successful rear disc conversion.
DO YOU NEED TO REPLACE THE MASTER CYLINDER?
If you are doing a disc brake conversion on a pre-1970s vehicle, you may need to replace the master cylinder. If you do need a new master cylinder, you can replace it before or after you perform your disc brake conversion; but remember to do it before you bleed the system and to prime the master cylinder with fluid before bleeding the entire system to avoid air locks. To do this, you will need a master cylinder, booster, vacuum hose, and proportioning valve. These parts are frequently sold as kits. The majority of problems experienced in the conversion comes from not replacing the master cylinder system so it is wise to double and triple check to make sure you have the correct master cylinder system. Also; now is a good time to visually inspect all of your classic car’s hard brake lines for severe corrosion and rust, and replace those lines that look questionable. This comes from first-hand experience.
Rear Disc Brake Conversion
One reason automakers favor a front-disc/rear-drum configuration (aside from the low cost), is that drum brakes require a simpler — and cheaper — mechanism to operate the parking brake. On drum brakes, the parking brake cable controls a lever that is connected to the brake shoes. With disc brakes, the lever attaches to a separate mechanical device inside the caliper piston that pushes the piston into the pads. On some cars, the lever attaches to a separate drum inside the rear brake rotor, depending on single-piston or four-piston calipers brakes.
What this means for your conversion is that, depending on your vehicle, you may need to install an entirely new parking brake system. If you are lucky and your new brakes are compatible with your parking brake system, all you will need to do is disconnect the parking brake before removing the old brakes, and then reconnect it after you have installed the new ones.
Removing the Drum Brakes
Rear drum removal is essentially the same as removing front drums, except for that pesky parking brake. Start by removing the wheels and then the dust cap, the center nut and washer and the brake-drum bolts. Before you remove the drum, you need to disconnect the brake hose and parking brake cable. After you remove the drum, inspect the spindle and either replace it or reuse it. Then reposition and secure the steering arm.
Installing the Disc Brakes
Attach the rotor to the spindle, followed by the washer, the bearing and nut and the cotter pin. Then put the dust cap on and move on to the caliper assembly.
Before positioning the caliper on the rotor, attach the new brake lines and install the pads. Then place the caliper over the rotor and attach the parking brake and the brake lines. Put the wheels and tires back on and you are nearly done.
As with the front conversion, it is extremely important to bleed the brakes and refresh the brake fluid. Equally important is testing the parking brake and making necessary adjustments.
PARKING BRAKE ADJUSTMENT
How much should you adjust your parking brake? In general, you should hear four clicks when pulling your hand lever if the parking brake is adjusted properly. If the cable is not tight enough, the brake will not keep your vehicle from rolling. If it is too tight, it may not release the brake fully, causing it to drag and wear out rapidly.
Disc Brake Conversion Kits
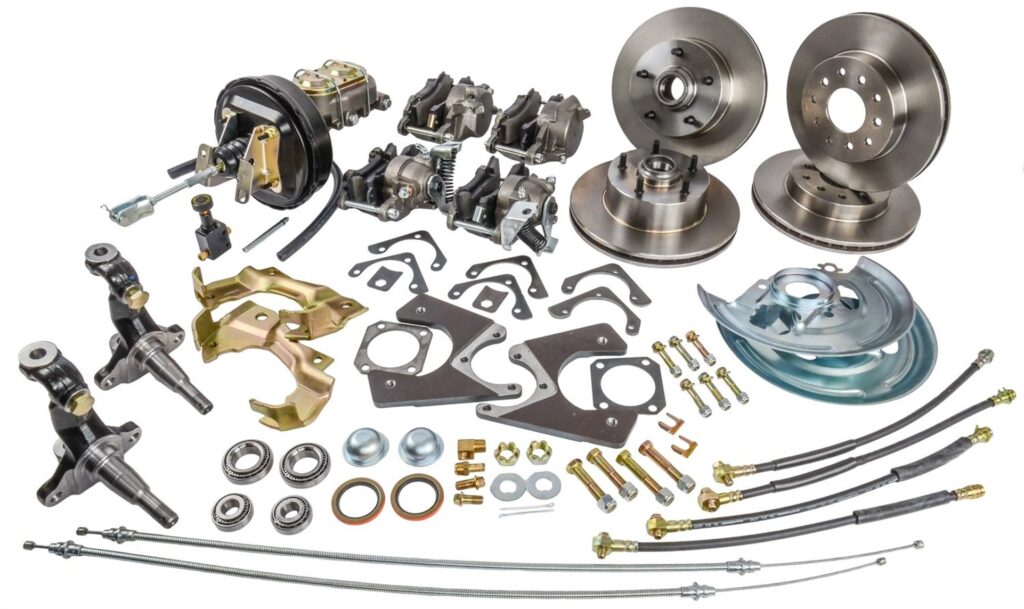
In general, the brake-conversion-kit market is geared toward high-performance — not to mention high-cost — brakes. So, deciding whether to buy a conversion kit or gather parts from a junkyard or parts store depends largely on what you are looking to get out of your conversion.
If you are simply upgrading brakes on a much older vehicle, a conversion kit might be overkill, and could end up costing a bit more than donor parts.
On the other hand, the nice thing about conversion kits is that they save you the time and effort of hunting through junkyard wrecks and auto store parts bins to find what you need. For instance, a conversion kit for a 1969 Chevrolet Camaro costs between $1,000 and $3,000. The same conversion performed using a combination of junkyard and auto store parts, cost one do-it-yourselfer $800.
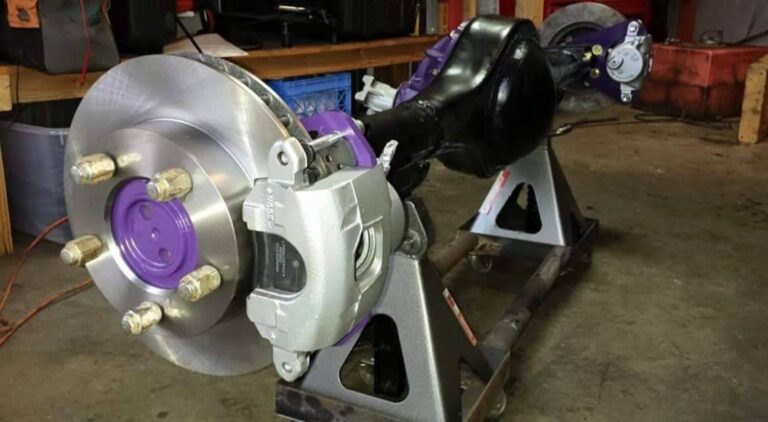
Conversion kits can cost anywhere from $500 to $3,000. The lower-end conversion kits have simple flat rotors, while high-end kits often have rotors that are slotted to keep them cool as well as 4 and 6 piston calipers. High-end performance kits also put emphasis on showiness, offering special finishes for the rotors and bright painted racing-style calipers.
Keep in mind that although there may not be a specific conversion kit available for your vehicle, there is bound to be a compatible kit out there. Specific car enthusiast Web sites, forums and message boards are invaluable resources for finding out what kit best fits your needs for a conversion.
Remember that stopping a classic car is just as important as going fast.